Websand makes WooCommerce email marketing integration easy. You can now integrate your WooCommerce store directly to Websand in just a few clicks through our Zapier partnership. Making it so much easier to grow your e-commerce business through targeted email marketing campaigns and customer journeys managed by email marketing automation.
Set up will take you less than 5 minutes, here’s how it works.
Table of Contents
Step 1: WooCommerce Email Marketing Integration to Websand. Get an account.
If you are looking at WooCommerce Email Marketing integration, we’d expect you already have a WooCommerce store. The next thing you’ll need is a Websand account. Get a your Websand account by clicking on the button below.
Step 2: WooCommerce Email Marketing Integration to Websand. Get connected.
Now you have your Websand account in place, the next step is to collect to your WooCommerce store and get the data moving.
Given the differences in the way that WooCommerce stores are configured, they are rarely the same. Therefore the easiest way to set up your WooCommerce email marketing integration is by connecting a Websand account to your WooCommerce store using Zapier.
Providing you with an easy no-code way to select the customer data you want to transfer. Be that the signup of new subscribers or the processing of new orders from your customers.
Pick your preferred starting point from the options below.
And then follow these steps.
Step 2.1. Connect your WooCommerce account to Zapier.
The zap type is already selected for you however, you will need the WooCommerce Zapier extension to be purchased and installed on your website, see more information on how to install WooCommerce Zapier extension by clicking here.

This is the hardest part of the process, you may need to involve the people that created your WooCommerce website to get your plugin installed.
The good news is you’ll only need to connect the store once – with the occasional refresh depending on your authentication rules. Click on the link to find more information on connecting your WooCommerce store to Zapier
Once you’ve connected your WooCommerce store to Zapier, please test the connection, that will provide some test data. We’ll need this test data in the next step.
Step 2.2. Connect your Websand account to Zapier.
Your WooCommerce store is connected and you’ve successfully tested the connection. Now we need to connect your Websand account to Zapier.
If you are not using the template, select Websand as the APP and select the event you want to set up. If you are using the template, you already have Websand selected as your App option.
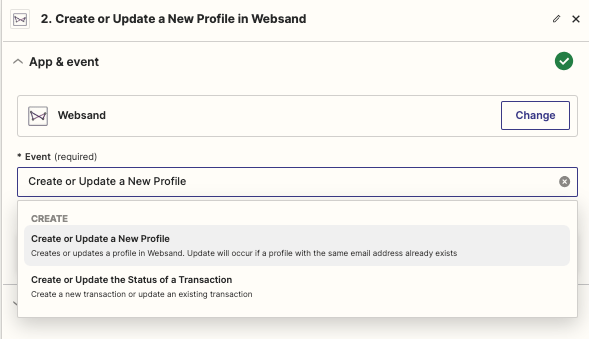
Click on the ‘Choose’ button
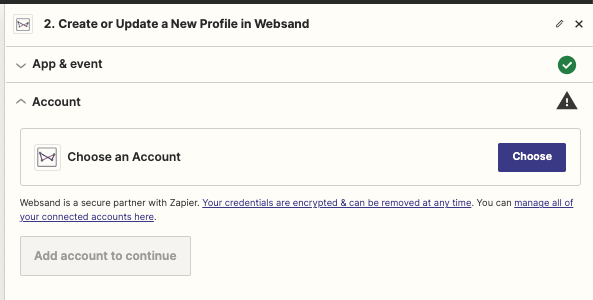
Then ‘+connect a new account’.

This will open the the ‘Connect an Account’ screen.
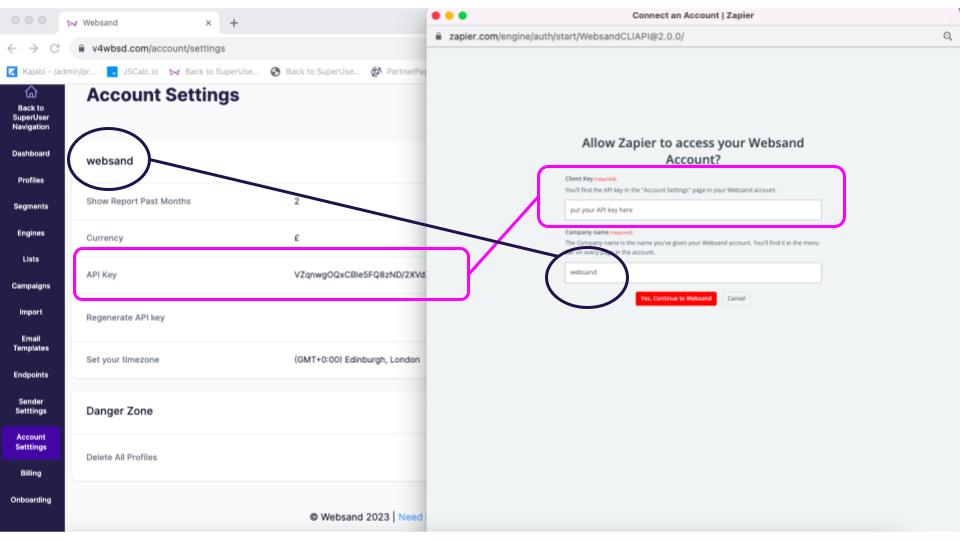
To complete this process, you’ll need your Websand account name and your API key, you can find this from the ‘Account Settings’ page in your Websand account – see below.
Once the account has been connected, the next step in WooCommerce email marketing integration process is to configure the data mapping from you WooCommerce account to your Websand account through the ‘Actions’ step in Zapier.
Step 3: WooCommerce Email Marketing Integration to Websand. Configure the data mapping in Zapier.
This step allows you to define which data you would like to send to Websand as part of your WooCommerce email marketing integration based on your rules around marketing consent. Please note that a new customer will be created as part of the transaction app, which reduces the need for both a profile and transaction zap for WooCommerce stores.
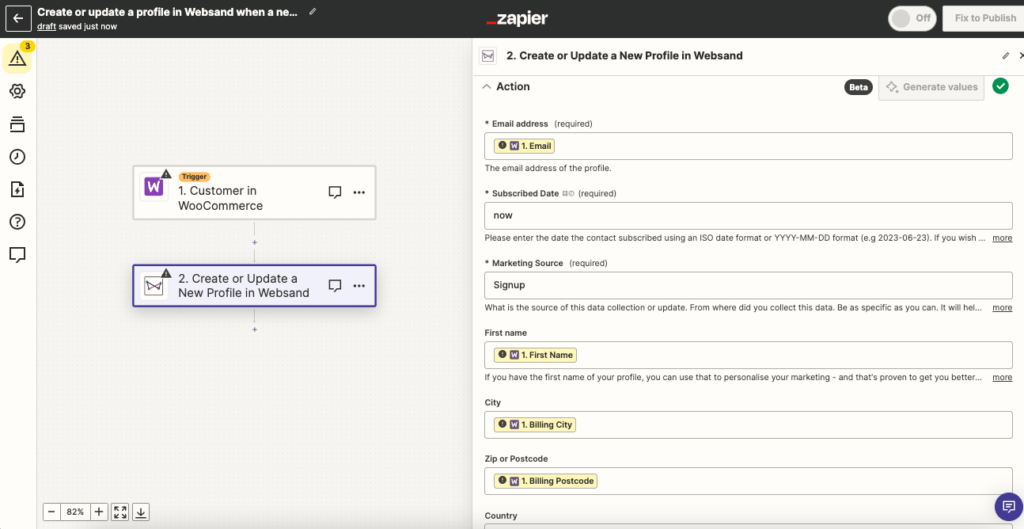
Step 3.1. Configure your Zap – When new customer data is created in WooCommerce, create or update a new profile in Websand
The profile zap is used to collect, process and update the profiles of your subscribers. New customers will be created and profiles will be updated as part of the transaction zap, so if you are processing orders, you might only need the ‘transaction zap’ – see step 3.2.
If you have selected the template option for the profile update zap, the key fields are already mapped namely:
Email address,
Subscribed date,
Marketing source
and First name.
A quick note on the Marketing source field.
The intention of the Marketing source field is to identify where the profile was either first acquired as a customer, or the last point of update/engagement with your business. This data point is also used for the ‘Source segmentation‘. The starting entry in the template is text, so please amend the marketing source as necessary based on your WooCommerce setup.
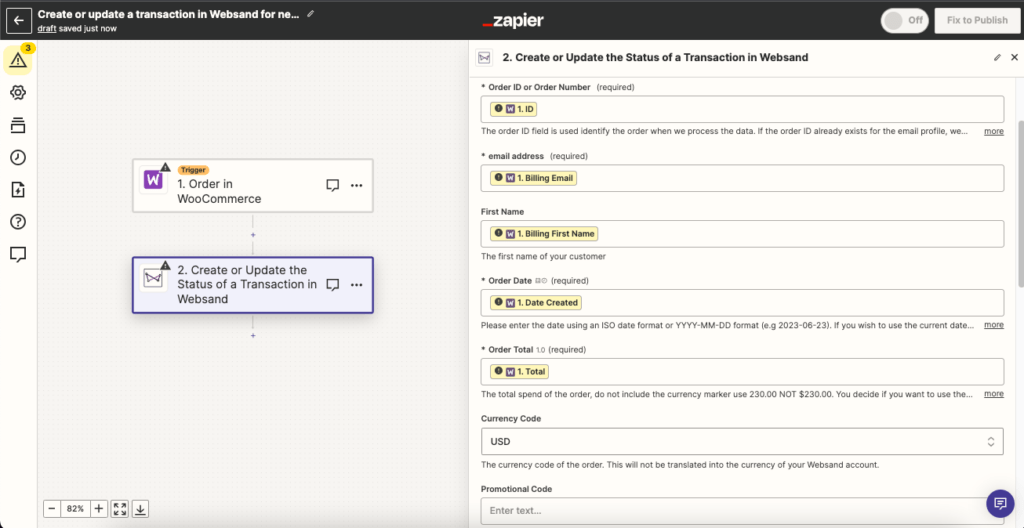
Step 3.2 Configure your Zap – When new order is created in WooCommerce, create a new transaction in Websand
It’s important that your WooCommerce email marketing integration reflects the setup of your WooCommerce store, a key part of that is your store setup.
In the transaction segmentation option in Websand, you’ll have the ability to segment your audience based on all the data you map here.
If you’ve selected the template option, the key fields are already mapped namely: Order ID, Email address, First Name, Order date, Order Total, and Items. We’ve also set the Marketing source as ‘online store’ (see note to above about the marketing source field), defaulted ‘Accepts Marketing‘ as True, and set the store currency code as ‘USD’. You
A note about mapping items, and line items within the order
The items section of the configuration allow you to map the line item fields, you have four options to map. Since the an order can contain more than one line item, the mapping will handle arrays. Read more arrays here.
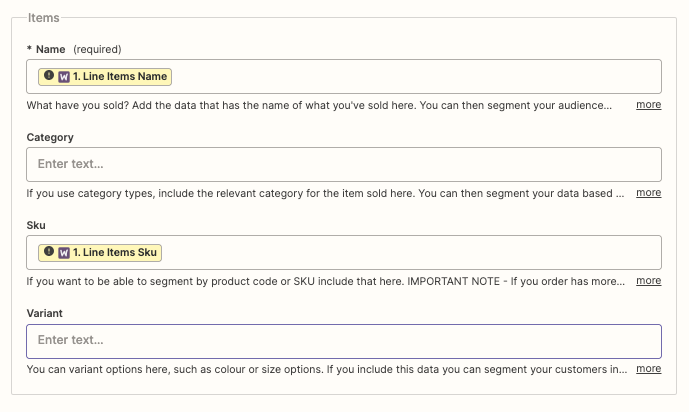
Name – the template presets the ‘items’ field has the option, this will add the products or services sold within the order.
Category – if you are using category to organise the products or services you sell, map that data here so you have that as a segmentation option based on the products sold within the order.
SKU – if you are using product codes or SKU’s, map that data here so you have that as a segmentation option based on the products sold within the order.
Variant – if you are using variants within your products such as colour or size, map that data here so you have that as a segmentation option based on the products sold within the order.
The fields you select will be available to segment within Websand so it’s important that you select the configuration which best suits your needs, and only include data you need to drive your marketing.
Depending on the product naming convention you’ve used in your WooCommerce store, and how you want to segment your data, you might want to switch this field mapping for a more appropriate field. E.g. iPhone 15 vs iPhone 15 – purple.
A note about mapping to the Order value field
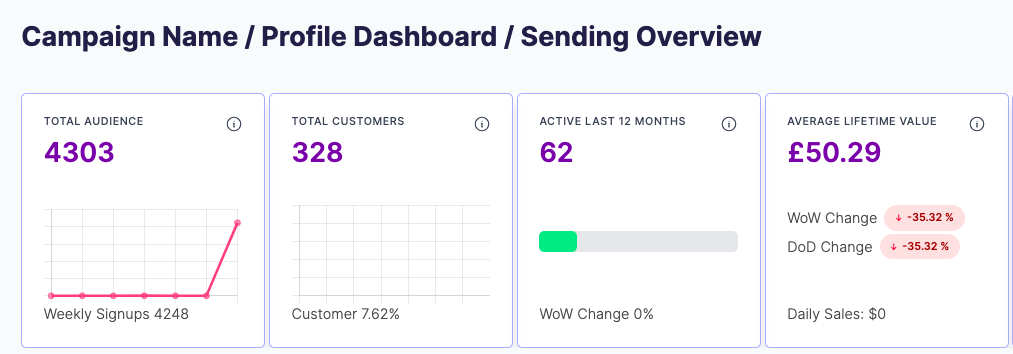
The order value will be used to update the customer lifetime value figure for each customer within your Websand account. This is featured on your Websand home page – see the example below.
As part of your WooCommerce email marketing integration, you can either decide to include the Total price of each order, including taxes and shipping. For the template, the default selected is the Subtotal which is the order value excluding taxes and shipping.
Either option works, it’s your decision as to how you which to apply the rule. Just remember if you include total price rather than subtotal price, the customer lifetime value figure generated from this part of the WooCommerce email marketing integration would include taxes and shipping.
A note about updating Customers
The marketing source field a mandatory part of the mapping, this is because it’s a mandatory part of the profile creation. If the transaction is for a new customer, a new profile will be created as part of the Zap – this means you don’t need to create another zap to create a new profile for a new customer. If a profile already exists in Websand for the email associated with the transaction, the ‘updated source’ field for the profile will be updated.
Step 4: WooCommerce Email Marketing Integration to Websand. Make the Zap live.
Once you’ve completed your settings, make sure you test the processing so all the fields are mapped correctly into your Websand account.
To check your Websand account, either check the profile, or create a test segment.
To check the profile. Take a note of the email address of the data you’ve select for the test Zap, and search for that in the Profile screen within your Websand account (see below).

Alternatively, use segmentation to make sure the data you’ve just created from the Zap exists as an segmentation option. Select Segment from the menu and select profile / ‘updated source’, in the case below that people have signed up from the Websand PPC campaign.

Or transaction / ‘product name’ as your segment option to make sure the option you’ve just created from the Zap exists as a segmentation option. In the case below, people that have Bought Product C
Once you are happy, switch the Zap On.
Once the zaps are switched on, your Websand account will be updated based on your customer behaviour.
Now the data is flowing, you are in business! Get to work on creating your marketing campaigns or your Engines (our name for Marketing Automation).
One final point… what about my existing data.
Step 5: WooCommerce Email Marketing Integration to Websand. Adding my existing customer and order data to my Websand account.
For your existing data, you’ll need to use the import process to add the data to your Websand account. Click on the links to find out more about…
How to import your WooCommerce customers and subscribers through Websand Audience Import
How to import your WooCommerce orders through Websand Transaction Import

Importing your suppressions.
If you are switching from an existing email marketing platform to Websand, please make sure you import your suppressions. That will save you a heap of time picking out unsubscribe and bounces from your existing subscribers and customer data.
Need help with your WooCommerce email marketing integration? Book a call.
If you need any further information about setting up your WooCommerce email marketing integration to Websand or want to find out more about how Websand can improve email marketing for your e-commerce store, book some time on the calendar below.