How to create an email marketing message in the Websand drag and drop editor
Now you’ve got the data bit in place, next step is to create your message.
Websand allows you to create mobile optimised email marketing using our easy to use but super effective drag and drop email template editor, you can even drop in your existing HTML.
This page also contains hints and tips to help you create the perfect email marketing message for your audience.
Table of Contents
How to design an email marketing template in Websand
You’ve organised your data using segmentation so you know exactly who you want to send your email marketing to.
The next step is to create some killer content in the email editor, and design engaging communications that will enlighten your audience.
Click here if you want some hints and tips to help you create the perfect email marketing message for your audience.
Getting started with the Websand email template editor
In Websand, you design your messages using our drag and drop editor. It’s super easy to use, but don’t be fooled, you can still create some unbelievable designs.
No need for extra coding or HTML designs. You’ll be able to achieve everything you need within the editor, and the framework means your design is automatically desktop and mobile optimised.
Our drag and drop email template designer is responsive is really easy to use, it’s even been described as ‘fun’ :).
It’s simple to use but built with delivery in mind.
The email templates you create within the editor will be configured to work on both mobile and desktop devices.
This is really important as Mobile is now the main device for viewing your email.
Creating a new email template message
To get started, click on ‘Email Templates’ from the Websand menu (the third icon down) in your Websand account and you’ll enter the following screen.
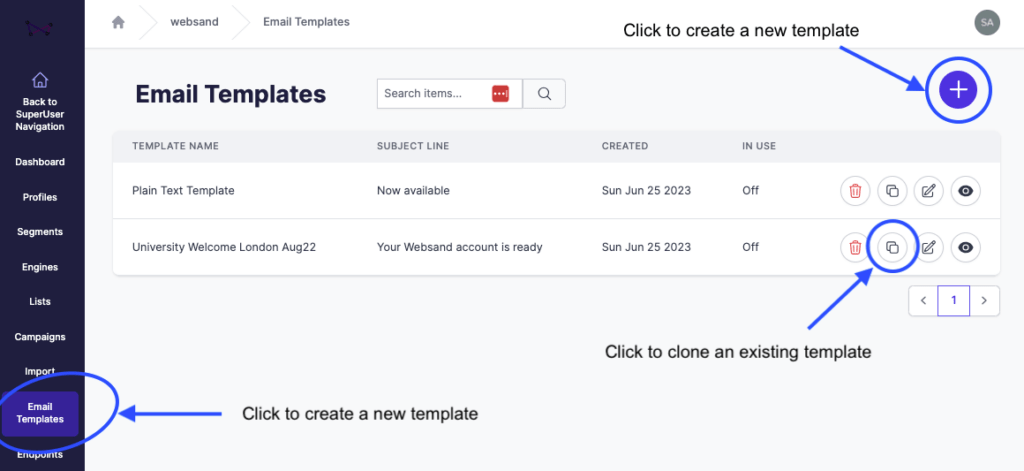
To create a new template, click the [+] button. That will take you through to template selection page, where you can select from our growing examples of email templates.
If you already have a template saved, you can clone that template and then make the necessary amends.
Once you’ve selected your template, you’ll enter the Email Description Page. Here you can name the template, add your subject line, send a test message, categorise the template and add your own internal description for the template (only people accessing your Websand account will see this).
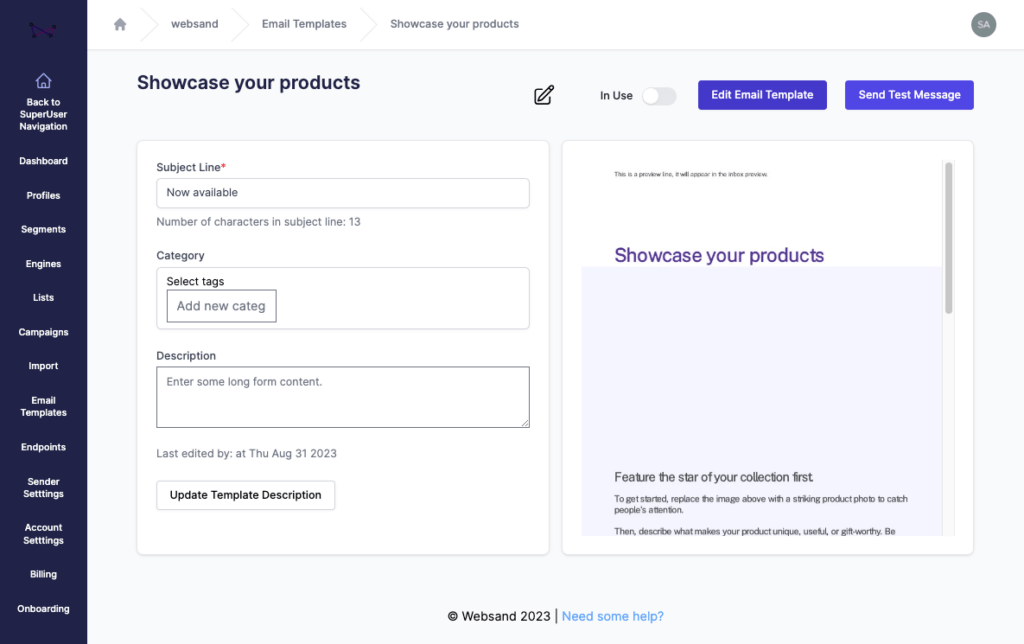
To edit your email tempate, click the ‘edit Email Template’ button in the top right of the screen.
Tip : When you give your message a name, be as specific as you can. You’ll need to able to easily identify it in the future for campaigns and for future reference.
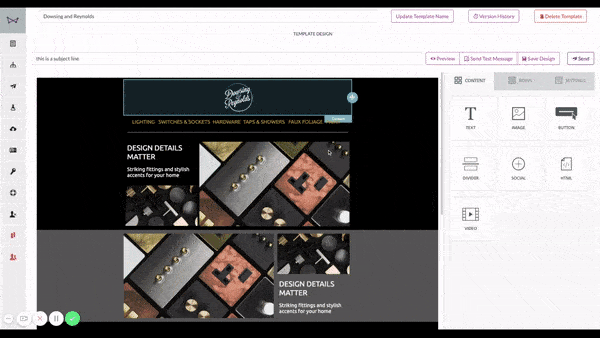
Designing your email template within the email editor
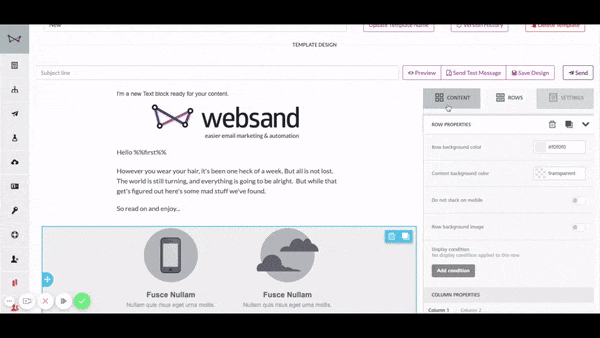
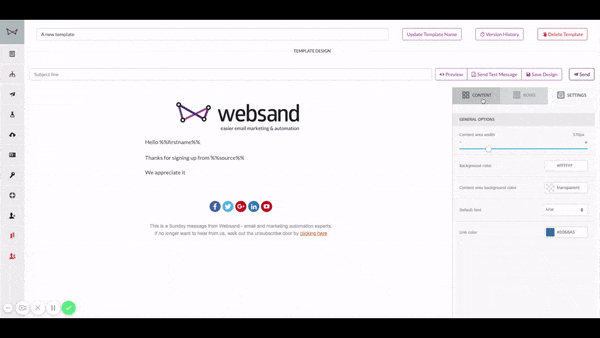
Once you enter the message design screen, you’ll see the screen below.
The template you’ve selected will already be place so you have a starting point to make the message your own.
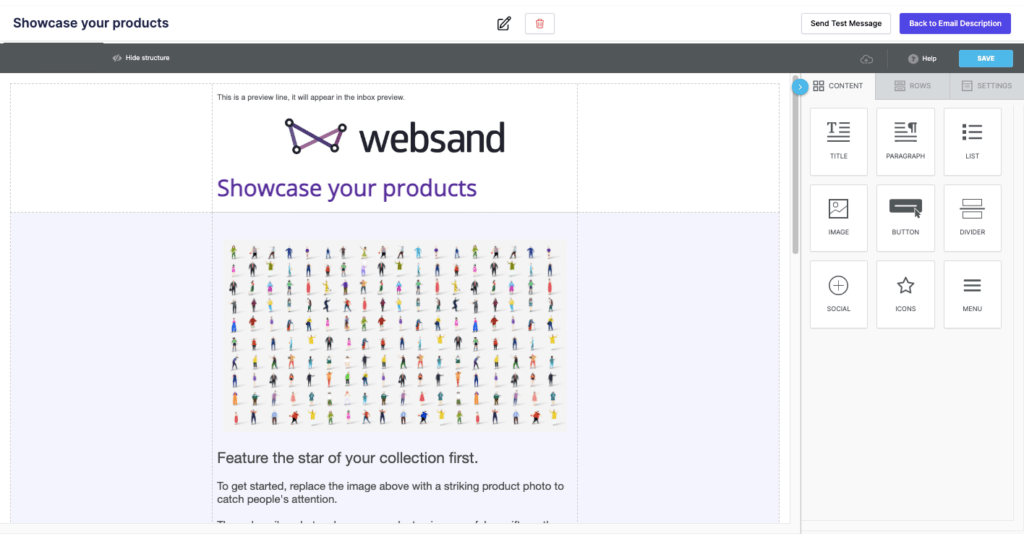
The left column contains the content of your message.
The right hand column is where you can make format changes.
You have three sections (in order); Content, Structure and Body.
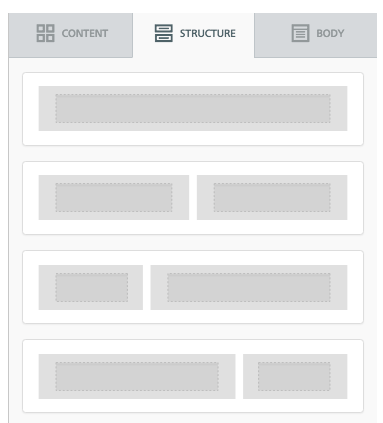
Create your email template structure
The structure section provides you with placeholders for your email design. These are mobile optimised and set the columns for you to populate with your preferred content.
Select a row structure that meets your requirements and pull that across into the message – you can then add content from the content tab into the message.
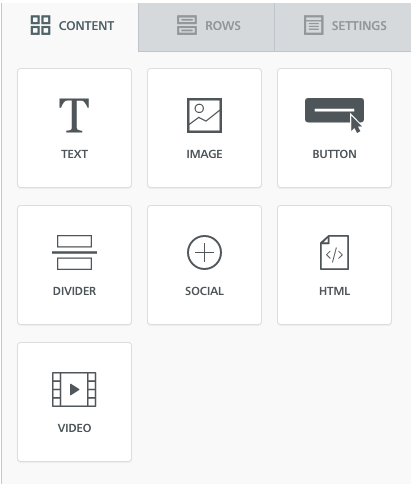
Select your content blocks
The Content tab gives you the building blocks you’ll need to create the design and content for your email message.
Select the content block you need, and pull it into the relevant part of your template structure.
Once the content block is in place you can then configure the block to fit your design requirements.
- Format and edit the text
- Upload, edit or link your image (see image editing for advanced options)
- Design and edit your button
- Design your divider
- Edit your social links
- Add some HTML code to your message
- Include a YouTube or Vimeo hosted video within your template
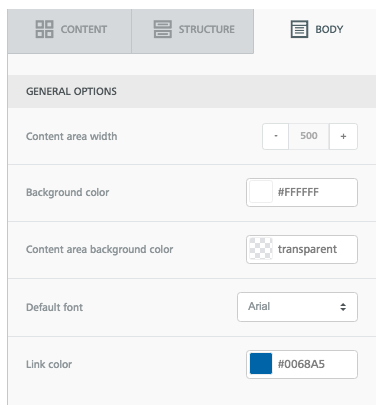
Use the Body Tab to configure your email template
Use the settings within the body tab in the right column to define the overall structure of your email template design.
Within the body tab you can define the following settings for your overall email template design
- the content area width of the email message (we usually use between 580px and 620px)
- the background colour
- the content area background colour
- the default font for your email content
- the default colour for links in your email
Drag and Drop explained. Moving around the email editor
The drag and drop editor is easy to use, but a few of the icons might need explaining before you get started.
Deleting rows or content blocks
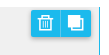
You can remove any ‘content’ or ‘structure’ by simply clicking on the bin icon in the corner of the respective content (block) or structure (row)
Copying rows or content blocks
You can copy any ‘content’ or ‘structure’ by simply clicking on the bin icon in the corner of the respective content (block) or structure (row).
Note the settings of that content block – URL, background colour, padding etc will remain in place unless you change them by clicking on the block and accessing the row or content properties from the right column
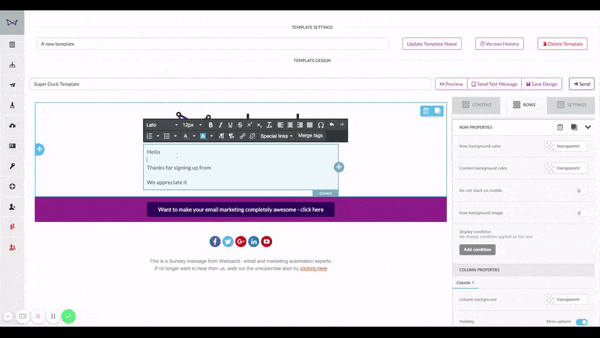
Creating your email marketing message
Add your subject line
Maybe you start with your subject line, or maybe you finish with it?
Whatever your preference, don’t forget to add your subject line, and if you want to personalise it you can add merge tags.

Setting the structure of your email design template
To set the format or structure of the message, by pulling your preferred structure from the structure menu into the content of the message. That will add a new Row to your message.
Click on the row (structure block) within the message and a border will appear. The right hand column will then change and provide you with the editing options for that structure block.
How to configure the individual elements within the email template
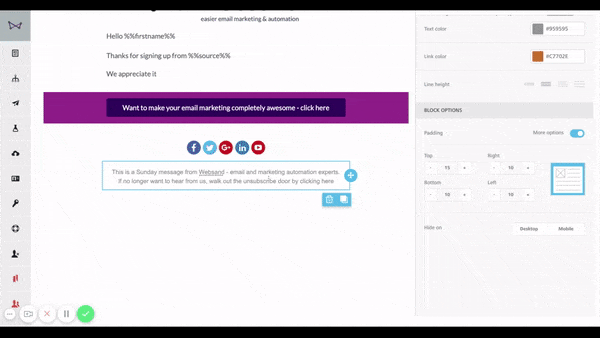
You can also configure individual sections within your template. Clicking into the relevant content or row structure to can edit specific colour, structure rules and design elements related to the selected area of your template.
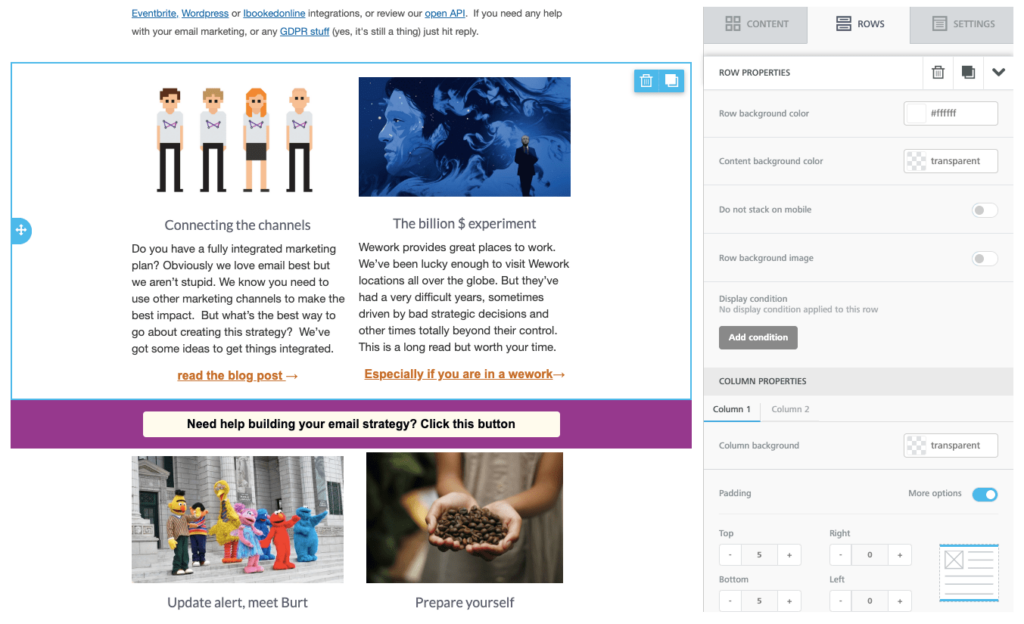
The right hand column will then change and provide you with the editing options for that structure block. You can define the rules for the row and also for the individual columns within the row. Here are your options
Row Properties
Select a row you can configure the following
- Edit the column background colour
- Edit the colour of the content within the row
- Select to stack or not stack the content of the row on mobile
- Set an image background for the row
Column Properties
For each of the columns within the selected row you can configure the following for the selected column:
- the colour background
- padding (space around the column)
- the border (line width and colour)

Using images to your email template
Adding images
Websand has lots of image options to make sure you get your email designs perfect.
Drag an image content block from the content section into your message and then click the browse button to access your image files in the file manager.
Once in position, use the content properties to…
- change image
- resize the image
- re-align the image
- edit an image to crop, add filters, stickers, text or frames
- add a hyperlink to the selected image
- give your image more space to breathe by add some padding around the image
- or hide the image on desktop or mobile.
For more detail on how to access the royalty free image library, add your own images or edit images please read this more detailed tutorial outlining all the image options within the Websand drag and drop email template editor
Adding or editing text
Whether you’ve added a text block of content or if you want to edit an existing block of text, the process is the same.
Click into the text and cursor will appear within the text. Simply type or delete the text to change the content of the text block.
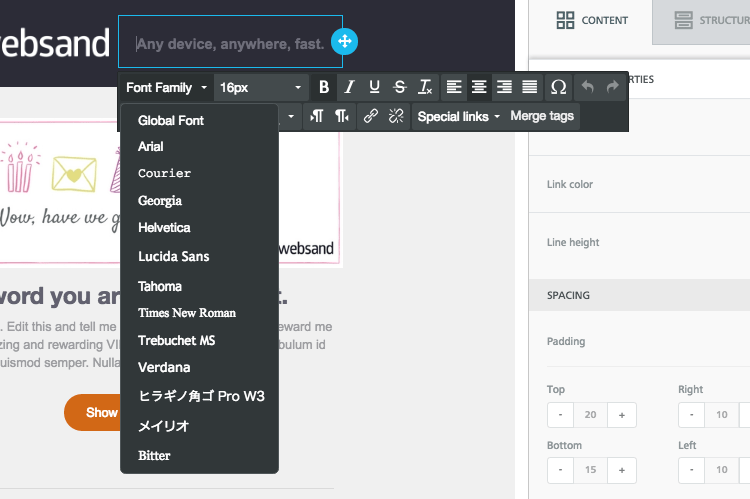
When you click, a formatting menu will also appear (see below). Use this to change the format of the text, the alignment of the text, the font style, the font size, and add hyperlinks to your text.
Once you’ve finished editing, click away and the content will be updated.
The editor will auto save changes, but it’s always good to save your message just to make sure.
Adding Personalisation to your content using Merge tags
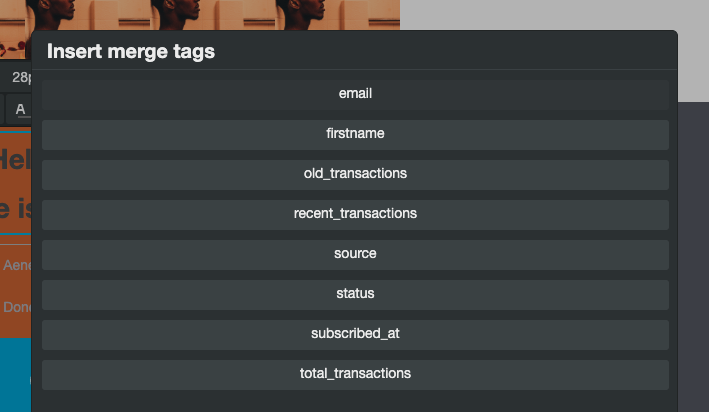
In Websand, you can personalise your message using the merge tag option from the text format menu.
Personalisation is limited to the data you have collected about the individual, when you select ‘merge tag’ from the text format menu, you’ll be presented with a list of fields you can select from.
Personalisation is limited to the data you have collected about the individual, when you select ‘merge tag’ from the text format menu, you’ll be presented with a list of fields you can select from.
If you have collected first name and company name as part of your data collection, you could merge these fields into your message.
As a result, your personalisation message template would read something like this.
Hello %%firstname%%,
We know that marketing automation can seem a bit complicated, but it needn’t be. Start simple and you’ll soon see a positive measurable difference to %%company%% revenues.
When the template is used within an email marketing campaign or marketing automation, the merge fields will be personalised based on the data you’ve collected about that individual.
Tip when using personalisation
If you don’t hold the ‘merge data’ for every individual don’t worry. When the merge occurs, if you don’t hold the data about the individual, the merge field will be blank. That’s why we always suggest to use ‘Hello’ rather than ‘Dear’ when addressing the reader in the email message content.
Create that killer call to action with Buttons
Adding Buttons
To add a button to your email marketing template, select button from the content option from the right column of the editor and pull the button into your email design.
Make that button your own (editing a button)
To make the your call to action really stand out and drive engagement, you’ll need to edit the basic button that has been presented.
Clicking on the button will allow you to edit your call to action text. It will also open the text editor menu where you can edit font family, and font colour.
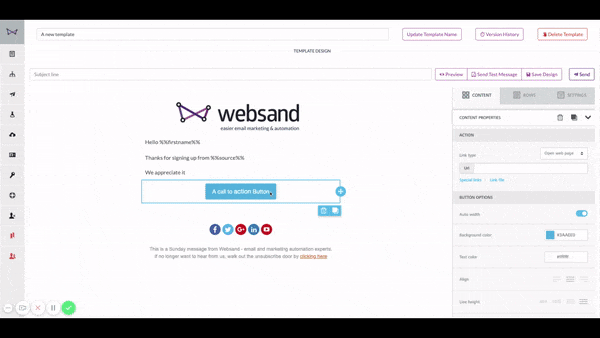
Click the button and content properties for that button will appear in the right hand column. In the content properties you can change the following:
- Set where you want your reader to be directed to when they click (be that a URL, make a call, send an email)
- Change the button colour
- Set the line height
- Add some content padding and padding around the button
- Change the button corner radius
- Set if you want to hide the button on desktop or mobile
Tips for using buttons.
Always use the default maximum line height on buttons. We’ve discovered that Outlook doesn’t like buttons that don’t have maximum line height.
And, wherever possible, set the width of the button rather than rely on autofit.
Setting up your Unsubscribe link
When you are using email marketing, unsubscribe is a mandatory thing. But don’t worry unsubscribe is actually a good thing (read this blog post about unsubscribing)
If you forget to include an unsubscribe link to your template, we’ll automatically add one for you, but it’s always best for you to add one yourself. Here’s how…
To add an unsubscribe link to selected text, select ‘special links’ from the text editor and then select unsubscribe. That will add the unsubscribe link to the message when it is sent out.
Confirming the unsubscribe to the subscriber
It’s always a good idea to brand up a page on your website to confirm to the person that has unsubscribed that their request has been successfully processed. Proves you’ve been respectful and follow best practice.
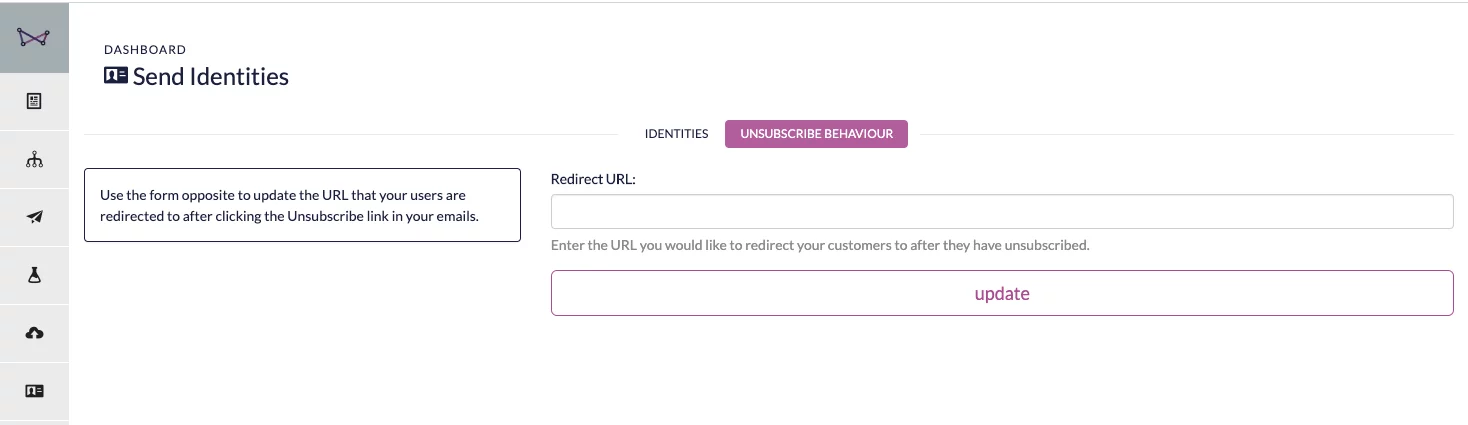
You can set up your unsubscribe redirect link from the ‘send identity’ menu in Websand.
Managing unsubscribes and other suppressions
Any members of your audience that decide to unsubscribe will be collected back into Websand as a suppression and Websand will then make sure that they are removed from future marketing activity.
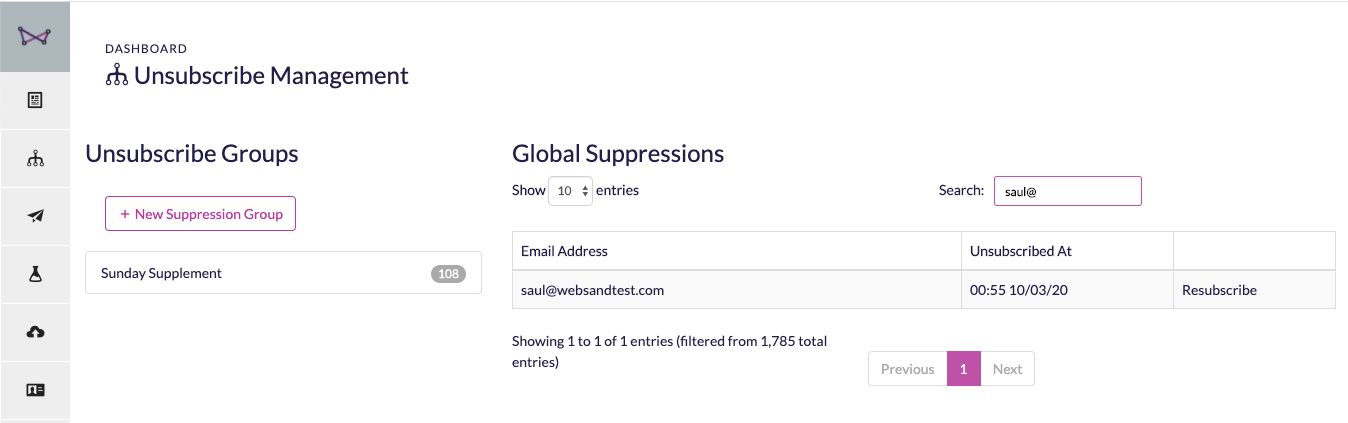
This keeps you safe from unsubscribe issues, future data protection changes and respects the wishes of your audience.


Need help with your email design?
If you need more help using Websand drag and drop email design tool or if you are looking to design the perfect email. We can help, so please get in touch.
Email support@websand.co.uk or book a meeting on our calendar.